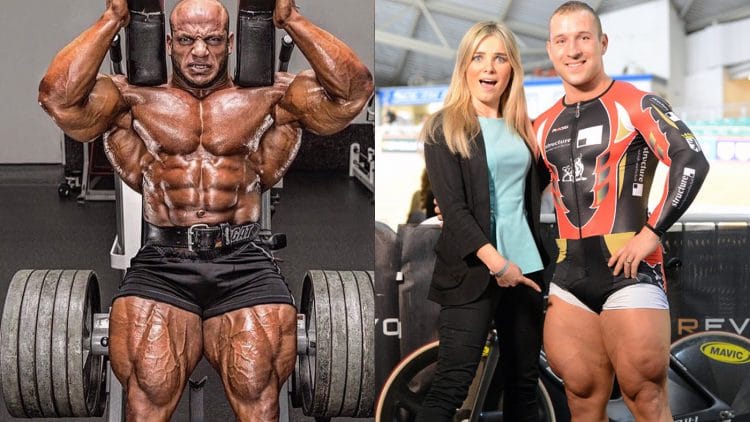
Most fitness coaches and bodybuilding experts agree that lower body training is the key to a good physique. After all, your legs make up about 40% of your total muscle mass. It doesn’t matter if you want to get HUGE, tone up, lose weight, run faster, jump higher, or just look good in shorts; you can’t skip your leg workout.
But what if you find leg training boring? Maybe you’re fed up with doing the same old lower body training staples, like squats, leg presses, deadlifts, and lunges. Or perhaps your progress has just ground to a halt.

If you’ve lost your leg training mojo, it’s time for a new approach. In this article, we’re going to introduce you to some new exercises designed to rekindle your enthusiasm for lower body workouts and get your training back on track.
Leg Training Anatomy
Legs or lower body is a very simplified name for what is actually a vast and complex group of muscles. To develop an attractive and functional lower body, you need to pay attention to all your leg muscles, both large and small. After all, a chain is only as strong as its weakest link.

The main muscles you’ll be training in this program are:
Gluteus maximus – known as the glutes for short, this is your main hip extender. The glutes are the largest muscle in the human body and potentially the strongest. Well-developed glutes will give you a shapelier butt.
Quadriceps – located on the front of your thighs, the quadriceps extend your knee and flex your hip. There are four quadriceps: rectus femoris, vastus lateralis, vastus medialis, and vastus intermedius.
Hamstrings – there are three hamstring muscles: biceps femoris, semimembranosus, and semitendinosus. Located on the back of your thighs, the hamstrings flex your knees and, working with your glutes, also extend the hips.
Abductors – located on the outside of your hip and thigh, the adductors lift your leg out and away from the midline of your body. The adductors include gluteus minimus, gluteus medius, and the tensor fascia latae (TFL).
Adductors – there are three adductor muscles: longus, brevis, and magnus. Located on the inside of your thighs, these muscles draw your leg in toward the midline of your body.
Workout Overview

This workout is meant to be done once or twice a week. If you do it twice, train on non-consecutive days, e.g., Monday and Thursday, to allow plenty of time for rest and recovery.
Start each workout with a thorough warm-up to prepare your joints, muscles, and mind for what you are about to do. Do 5-10 minutes of easy cardio followed by a few dynamic mobility and flexibility exercises, focusing on your ankles, knees, hips, and lower back.
Finish your warm-up with a couple of sets of the first 1-2 exercises to make sure you are firing on all cylinders and ready to work!
Because most of the exercises in this workout will be new to you, start light and increase the weight gradually as you get used to them. Going too heavy too soon could result in severe post-exercise delayed onset muscle soreness or even injury.
Finally, remember that intense strength training takes a lot out of your body, causing microscopic damage and inflammation to your muscles. While that might sound horrendous, this damage is the trigger for muscle growth and strength.
However, it also means you must support your workouts with a nutritious diet and plenty of rest and sleep. Food, rest, and sleep put back into your body what training takes out.
The Workout
Do this workout once a week if you are happy with your lower body development or just want to make small improvements. But, if your lower body needs work, prioritize your legs by training them twice a week.
Use weights that take you to failure within the prescribed repetition range.
The Bigger Thighs Workout
| Exercise | Sets | Reps | Recovery | |
| 1 | Goblet cyclist squats | 4 | 6-8 | 120 seconds |
| 2 | Zercher good mornings | 4 | 6-8 | 120 seconds |
| 3 | Bulgarian split squat jump | 3 | 8-10 per leg | 90 seconds |
| 4 | Barbell single-leg Romanian deadlift | 3 | 8-10 per leg | 90 seconds |
| 5 | 2-up, 1-down leg curls | 2 | 10-12 | 60 seconds |
| 6 | Leg extension 21s | 2 | 21 | 60 seconds |
| 7 | Booty band century squat | 1 | 100 | N/A |
Exercise Descriptions
Get the most from this or any other workout by doing all the exercises correctly. Doing exercises the right way helps to keep the tension on the target muscles while minimizing joint stress. The wrong way makes your workout less effective while increases your risk of injury.
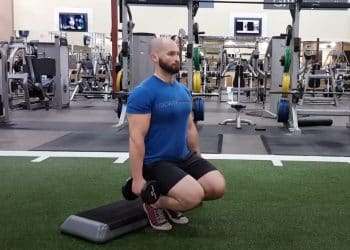
1. Goblet cyclist squats
Some of the biggest, most muscular legs in sports belong to cyclists. This exercise is designed to replicate pedaling up a steep hill. Cyclists use it in their training, and if it works for them, it’ll probably work for you too.
How to do it:
- Hold a single dumbbell or kettlebell in front of your chest, just below your chin.
- Stand with your feet about hip-width apart, heels on a 2 to 3-inch block or weight plate. Turn your toes out slightly.
- Keeping your torso upright, brace your core, and squat down as deep as you can without rounding your lower back.
- Stand back up, stopping just short of full knee extension to keep your quads under constant tension.
- Squat back down and repeat.
Read also Is Cyclist Robert Forstemann The New “Quadzilla”?
2. Zercher good mornings
Good mornings are so-called because, when you do them, you like you are bowing to greet someone. Most people do good mornings with the barbell racked on their upper back, like they were about to do squats. This creates a long lever and puts a lot of stress on your lower back. Holding the bar in front of you reduces lower back stress but ensures that your glutes and hamstrings still get a great workout.
How to do it:
- Hold a barbell in the crook of your elbows, hands linked and pulled in close to your chest. Stand with your feet shoulder to hip-width apart, abs braced. Bend your knees slightly, and then keep them rigid for the duration of your set.
- Push your hips back and hinge forward from your hips. Lean over until your upper body is roughly parallel to the floor. Do not round your lower back.
- Drive your hips forward, stand up straight, and repeat.
- Wrap your bar in a towel or exercise mat, or use a squat bar pad for extra comfort if necessary.
3. Bulgarian split squat jump
Bulgarian split squat jumps are a unilateral plyometric exercise, which is a fancy way of saying they work one leg at a time and are done explosively. Unilateral exercises are good for identifying and fixing left-to-right strength imbalances and, because you’ll need to work harder to stop your knees dropping in or out, also increase abductor and adductor activation. Master this exercise without weights before doing it with a dumbbell in each hand.
How to do it:
- Stand with your back to a knee-high bench or chair. Bend one leg and put your foot up behind you. Hop forward and into a split stance.
- Bend your legs and lower your rearmost knee down toward the floor.
- Drive off your front leg and leap up into the air, keeping your rear foot in place on the bench.
- Land with your front leg slightly bent, descend into another rep, and repeat.
- Do the same number of reps on each leg.
4. Barbell single-leg Romanian deadlift
The Romanian deadlift is an effective posterior chain exercise, meaning it works your hamstrings, glutes, and lower back. However, doing it one leg at a time increases glute, abductor, and adductor activation and will also improve your balance.
How to do it:
- Hold a barbell with an overhand, shoulder-width grip. Stand with your feet together and brace your core. Shift your weight over onto one leg.
- Hinge forward from your hips while simultaneously extending your opposite leg out behind you as a counterbalance. Lower the bar to just below your knee, taking care not to round your lower back.
- Stand back up and repeat.
- Do the same number of reps on each leg.
5. 2-up, 1-down leg curls
While leg curls aren’t anything new, this is an unusual way to do them. With this method, you can lift more weight than usual, making them more challenging and effective. Do seated or prone leg extensions as preferred.
How to do it:
- Using a seated or prone leg extension machine, bend both legs and pull your heels into your butt.
- Using just your left leg, slowly lower the weight down until your knee is extended.
- Lift the weight using both legs, and then lower it with the right.
- Continue lifting the weight with two legs and lowering it with one for the duration of your set.
6. Leg extension 21s
21s, also known as the matrix system, is a training method usually associated with biceps training. However, it’s also a very effective way to work your legs. And yes, that wicked burn you feel in your quads is entirely normal!
How to do it:
- Sit on your leg extension machine, adjusting the backrest, so your knees are aligned with the machine’s lever arm pivot point. Place the lower leg pad across your upper ankles.
- Extend your knees and lift the weight about halfway up. Lower and repeat for seven reps.
- Next, and without stopping, do another seven reps from halfway up to full knee extension.
- Finally, do seven full-range reps to total 21.
7. Booty band century squat

Your final exercise is a bodyweight finisher. Finishers are designed to “finish off” the target muscles to make sure you have worked them as hard as possible. Most finishers are very challenging, making them good for developing mental toughness, too.
How to do it:
- Put a booty band around you’re your legs just above or below your knees. Step out and into a shoulder-width squat stance, toes turned slightly outward. Push your knees out against the resistance offered by the band.
- Push your hips back and squat down until your thighs are at least parallel to the floor. Do not round your lower back.
- Stand back up and repeat.
- Continue until you have done 100 reps. Take short (5 to 10-second) breaks as necessary but try and complete the 100 reps in as few sets as possible.
How to Get Bigger Thighs – Wrapping Up
While there is nothing wrong with training staples like squats, deadlifts, leg presses, and lunges, you’ll eventually get bored if that’s all you ever do. Not only will you stop enjoying your workouts, but they’ll also start to lose some of their effectiveness.
Your body is very good at adapting to exercises and workouts, and the more often you do something, the less productive it will become. If you continue training the same way, eventually, your progress may even grind to a halt, and you’ll find yourself stuck in a rut.
Shake up your lower body training with some new and unusual exercises. Do this workout for 4-8 weeks to add new life to your training and reignite your progress.
 You can also follow us on Twitter, Facebook, Instagram, and
YouTube for even more content.
You can also follow us on Twitter, Facebook, Instagram, and
YouTube for even more content.